1 為什麼需要關聯?
為什麼 Model 之間要有關聯?關聯簡化了常見的操作,程式碼撰寫起來更簡單。比如,一個簡單的 Rails 應用程式,有顧客與訂單 Model。每個顧客可以有多筆訂單。若沒有關聯功能,則 Model 看起來會像是:
class Customer < ActiveRecord::Base
end

class Order < ActiveRecord::Base
end
為顧客新增訂單:
@order = Order.create(order_date: Time.now, customer_id: @customer.id)
刪除顧客以及顧客的所有訂單:
@orders = Order.where(customer_id: @customer.id)
@orders.each do |order|
  order.destroy
end
@customer.destroy
有了 Active Record 關聯,可以告訴 Rails Model 之間的關聯,來精簡上例。以下是簡化後的程式碼:
class Customer < ActiveRecord::Base
  has_many :orders, dependent: :destroy
end

class Order < ActiveRecord::Base
  belongs_to :customer
end
改寫成這樣後,給顧客建新訂單變得簡單許多:
@order = @customer.orders.create(order_date: Time.now)
刪除顧客以及顧客的所有訂單簡單多了:
@customer.destroy
要了解各種關聯的用途,請閱讀下一節。下一節介紹關聯種類、各種關聯的秘訣與小技巧。本篇最後一節是 Rails 關聯的可用選項與方法的完整參考手冊。
2 關聯種類
在 Rails 的世界裡,關聯連結了兩個 Active Record Model。關聯使用宏風格(macro-style)的語法來呼叫,以宣告的形式來加入功能到 Model。舉例來說,透過宣告一個 Model 屬於另一個,來告訴 Rails 如何維護兩者之間的主外鍵,同時獲得許多實用的方法。Rails 支援以下六種關聯:
belongs_tohas_onehas_manyhas_many :throughhas_one :throughhas_and_belongs_to_many
本篇之後細講如何使用各種關聯,首先介紹各種關聯的應用場景。
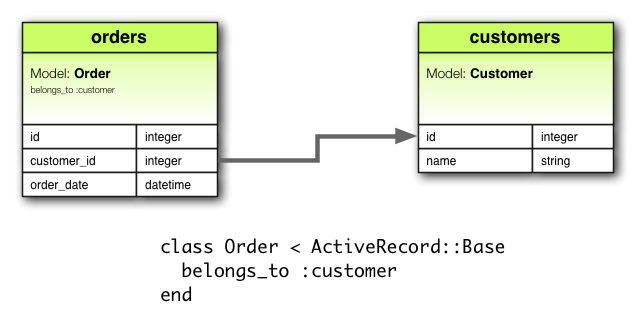
2.1 belongs_to 關聯
belongs_to 關聯建立兩個 Model 之間的一對一關係。belongs_to 關聯宣告一個 Model 實體,屬於另一個 Model 實體。舉例來說,應用程式有顧客與訂單兩個 Model,每筆訂單只屬於一位顧客,訂單 Model 便如此宣告:
class Order < ActiveRecord::Base
  belongs_to :customer
end
belongs_to 宣告必須使用單數形式。上例若使用複數形式,會報 "uninitialized constant Order::Customers" 錯誤。這是因為 Rails 使用關聯名稱來推出類別名稱。關聯名稱錯用複數,推斷出來的類別名稱自然也錯了。
上例對應的遷移看起來會像是:
class CreateOrders < ActiveRecord::Migration
  def change
    create_table :customers do |t|
      t.string :name
      t.timestamps null: false
    end

    create_table :orders do |t|
      t.belongs_to :customer, index: true
      t.datetime :order_date
      t.timestamps null: false
    end
  end
end
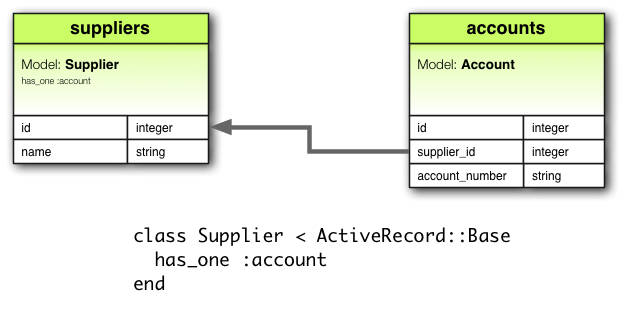
2.2 has_one 關聯
has_one 關聯建立兩個 Model 之間的一對一關係,但語義和結果與 belongs_to 不同。has_one 關聯宣告一個 Model 實體,含有(或持有)另一個 Model 實體。舉例來說,每個供應商在應用程式裡只有一個帳號,供應商 Model 便如此宣告:
class Supplier < ActiveRecord::Base
  has_one :account
end
上例對應的遷移看起來會像是:
class CreateSuppliers < ActiveRecord::Migration
  def change
    create_table :suppliers do |t|
      t.string :name
      t.timestamps null: false
    end

    create_table :accounts do |t|
      t.belongs_to :supplier, index: true
      t.string :account_number
      t.timestamps null: false
    end
  end
end
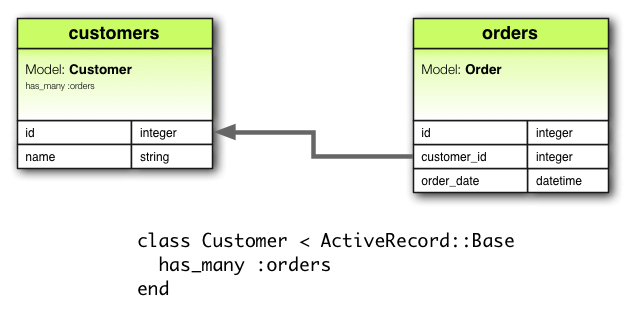
2.3 has_many 關聯
has_many 關聯建立兩個 Model 之間的一對多關係。通常 has_many 另一邊對應的是 belongs_to 關聯。has_many 關聯宣告一個 Model 實體,有零個或多個另一個 Model 實體。舉例來說,應用程式有顧客與訂單兩個 Model,顧客可有多筆訂單,訂單 Model 便如此宣告:
class Customer < ActiveRecord::Base
  has_many :orders
end
宣告 has_many 關聯名稱採複數。
上例對應的遷移看起來會像是:
class CreateCustomers < ActiveRecord::Migration
  def change
    create_table :customers do |t|
      t.string :name
      t.timestamps null: false
    end

    create_table :orders do |t|
      t.belongs_to :customer, index: true
      t.datetime :order_date
      t.timestamps null: false
    end
  end
end
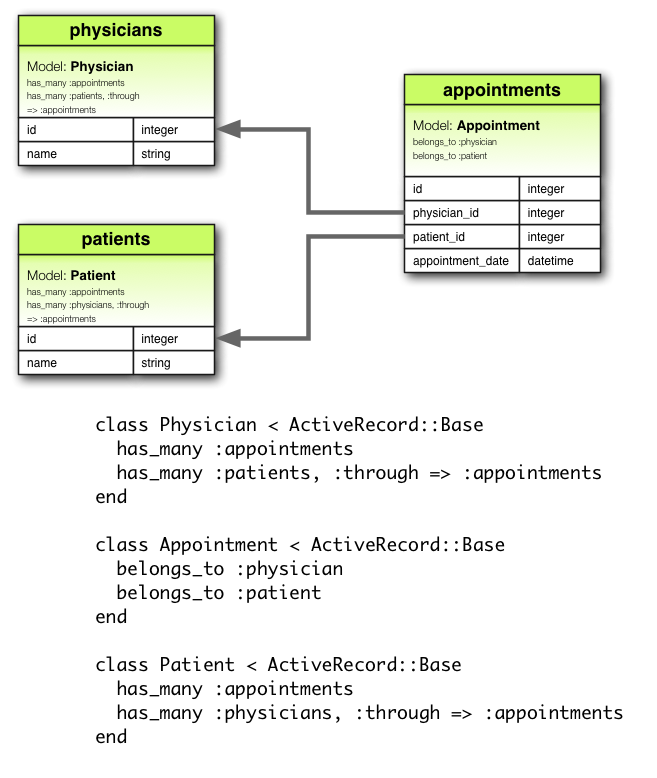
2.4 has_many :through 關聯
has_many :through 關聯通常用來建立兩個 Model 之間的多對多關係。has_many :through 關聯透過(through)第三個 Model,宣告一個 Model 實體,可有零個或多個另一個 Model 實體。舉個醫療的例子,“病患”需要透過“預約”來見“物理治療師”。相對應的宣告如下:
class Physician < ActiveRecord::Base
  has_many :appointments
  has_many :patients, through: :appointments
end

class Appointment < ActiveRecord::Base
  belongs_to :physician
  belongs_to :patient
end

class Patient < ActiveRecord::Base
  has_many :appointments
  has_many :physicians, through: :appointments
end
上例對應的遷移看起來會像是:
class CreateAppointments < ActiveRecord::Migration
  def change
    create_table :physicians do |t|
      t.string :name
      t.timestamps null: false
    end

    create_table :patients do |t|
      t.string :name
      t.timestamps null: false
    end

    create_table :appointments do |t|
      t.belongs_to :physician, index: true
      t.belongs_to :patient, index: true
      t.datetime :appointment_date
      t.timestamps null: false
    end
  end
end
連接 Model(Join Model)的集合可以用 API 關聯。比如:
physician.patients = patients
會為新建立的關聯物件建立連接 Model,如果刪除了其中一個物件,也會刪除對應的資料庫記錄。
連接 Model 會自動刪除、直接執行,不會觸發任何 destroy 回呼。
has_many :through 關聯在簡化嵌套的 has_many 關聯很有用。比如文件有多個章節、段落。想要簡單地從文件取得所有段落,可以這麼寫:
class Document < ActiveRecord::Base
  has_many :sections
  has_many :paragraphs, through: :sections
end

class Section < ActiveRecord::Base
  belongs_to :document
  has_many :paragraphs
end

class Paragraph < ActiveRecord::Base
  belongs_to :section
end
指定了 has_many :paragraphs, through: :sections 之後,Rails 便懂得如何透過章節,從文件中取得段落:
@document.paragraphs
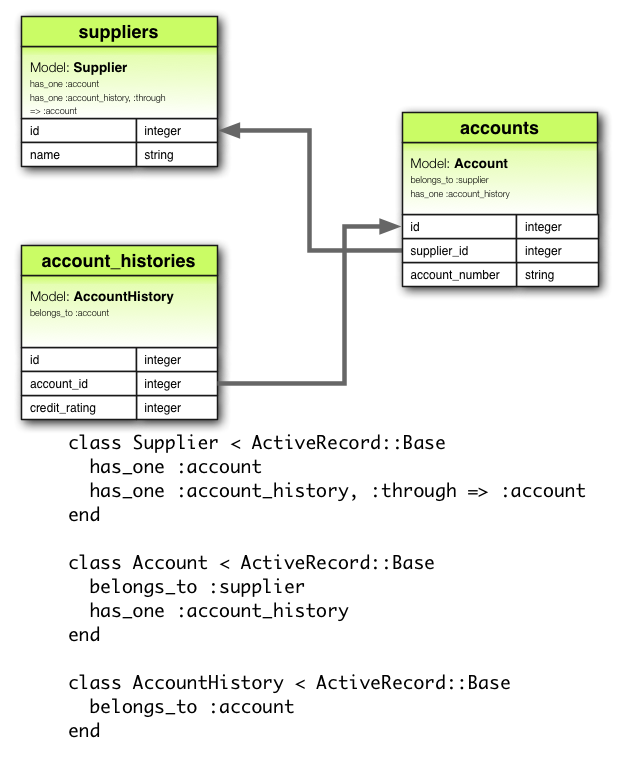
2.5 has_one :through 關聯
has_one :through 關聯建立兩個 Model 之間的一對一關係。has_one :through 關聯透過(through)第三個 Model,宣告一個 Model 實體,可有另一個 Model 實體。舉例來說,供應商有一個帳號,每個帳號有帳號歷史,相對應的宣告如下:
class Supplier < ActiveRecord::Base
  has_one :account
  has_one :account_history, through: :account
end

class Account < ActiveRecord::Base
  belongs_to :supplier
  has_one :account_history
end

class AccountHistory < ActiveRecord::Base
  belongs_to :account
end
上例對應的遷移看起來會像是:
class CreateAccountHistories < ActiveRecord::Migration
  def change
    create_table :suppliers do |t|
      t.string :name
      t.timestamps null: false
    end

    create_table :accounts do |t|
      t.belongs_to :supplier, index: true
      t.string :account_number
      t.timestamps null: false
    end

    create_table :account_histories do |t|
      t.belongs_to :account, index: true
      t.integer :credit_rating
      t.timestamps null: false
    end
  end
end
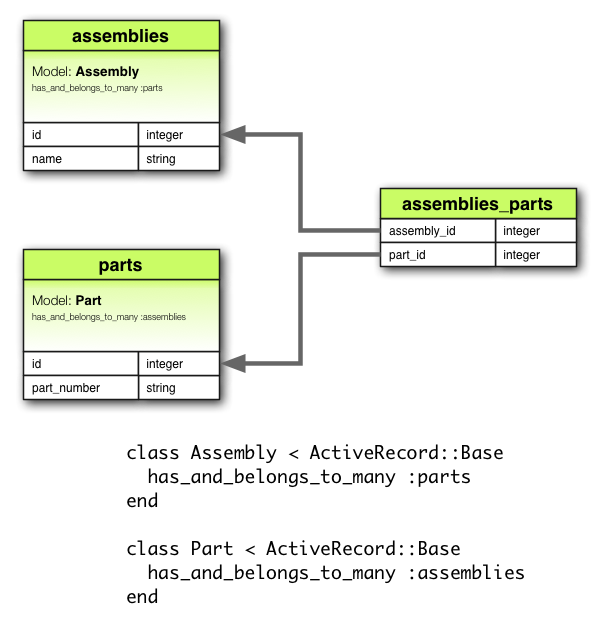
2.6 has_and_belongs_to_many 關聯
has_and_belongs_to_many 關聯建立兩個 Model 之間,直接的多對多關係。舉例來說,應用程式有組件(Assembly),組件下有部件(Part),可以如此宣告:
class Assembly < ActiveRecord::Base
  has_and_belongs_to_many :parts
end

class Part < ActiveRecord::Base
  has_and_belongs_to_many :assemblies
end
上例對應的遷移看起來會像是:
class CreateAssembliesAndParts < ActiveRecord::Migration
  def change
    create_table :assemblies do |t|
      t.string :name
      t.timestamps null: false
    end

    create_table :parts do |t|
      t.string :part_number
      t.timestamps null: false
    end

    create_table :assemblies_parts, id: false do |t|
      t.belongs_to :assembly, index: true
      t.belongs_to :part, index: true
    end
  end
end
2.7 belongs_to 與 has_one 的應用場景
如果想建立兩個 Model 之間的一對一關係,一邊宣告 belongs_to,另一邊宣告 has_one。怎麼知道那個要寫那個?
差異在於外鍵放在那個 Model(外鍵放在宣告 belongs_to 的關聯的資料表)。但應該要考慮實際的語義。比如 has_one 關聯表示某物屬於你,也就是供應商有一個帳號,比帳號擁有供應商合理。所以正確的關聯應這麼宣告:
class Supplier < ActiveRecord::Base
end

class Account < ActiveRecord::Base
  belongs_to :supplier
end
上例對應的遷移看起來會像是:
class CreateSuppliers < ActiveRecord::Migration
  def change
    create_table :suppliers do |t|
      t.string  :name
      t.timestamps null: false
    end

    create_table :accounts do |t|
      t.integer :supplier_id
      t.string  :account_number
      t.timestamps null: false
    end

    add_index :accounts, :supplier_id
  end
end
使用 t.integer :supplier_id 讓外鍵看起來更明確。這種寫法可以使用 t.references :supplier 抽象掉實作細節。
2.8 has_many :through 與 has_and_belongs_to_many 的應用場景
Rails 提供兩種方式來宣告多對多關係。簡單的方法是使用 has_and_belongs_to_many 來直接建立多對多關聯:
class Assembly < ActiveRecord::Base
  has_and_belongs_to_many :parts
end

class Part < ActiveRecord::Base
  has_and_belongs_to_many :assemblies
end
第二種建立多對多關係的方式是使用 has_many :through。這透過連接的 Model,間接建立出多對多關聯:
class Assembly < ActiveRecord::Base
  has_many :manifests
  has_many :parts, through: :manifests
end

class Manifest < ActiveRecord::Base
  belongs_to :assembly
  belongs_to :part
end

class Part < ActiveRecord::Base
  has_many :manifests
  has_many :assemblies, through: :manifests
end
最簡單的經驗法則表示,當多對多關係中間的 Model 要獨立使用時,使用 has_many :through;不需要對多對多關係中間的 Model 做任何事時,保持簡單使用 has_and_belongs_to_many(但要記得在資料庫建立連接的資料表)。
若是連接的資料表需要驗證、回呼或其他屬性時,使用 has_many :through。
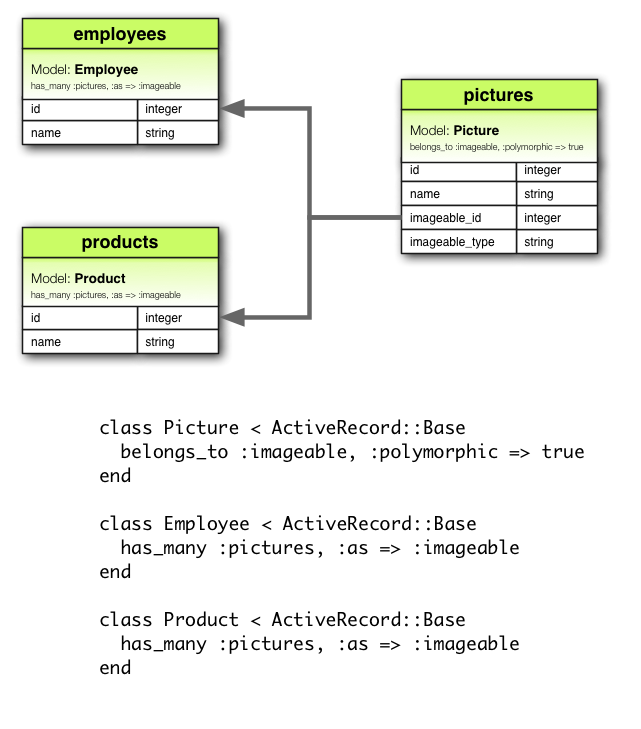
2.9 多型關聯
一種更進階的關聯用法是多型關聯。使用多型關聯,單個關聯裡,Model 可屬於多個 Model。舉例來說,圖片 Model 可屬於員工或產品 Model。相對應的宣告如下:
class Picture < ActiveRecord::Base
  belongs_to :imageable, polymorphic: true
end

class Employee < ActiveRecord::Base
  has_many :pictures, as: :imageable
end

class Product < ActiveRecord::Base
  has_many :pictures, as: :imageable
end
可以把多型的 belongs_to 宣告想成是一個介面,任何 Model 皆可使用的介面。在 Employee Model,可以透過 @employee.pictures 來取出所有圖片。同樣的,在 Product Model 亦然:@product.pictures。
如果有一個 Picture Model 的實體,可以使用 @picture.imageable 看擁有這張圖片的是誰(父物件)。但首先需要先在遷移裡,加入外鍵(*_id)與類型(*_type)欄位。*_type 類型欄位用來宣告此 Model 擁有多型介面:
class CreatePictures < ActiveRecord::Migration
  def change
    create_table :pictures do |t|
      t.string  :name
      t.integer :imageable_id
      t.string  :imageable_type
      t.timestamps null: false
    end

    add_index :pictures, :imageable_id
  end
end
上例遷移可用 t.references 形式簡化:
class CreatePictures < ActiveRecord::Migration
  def change
    create_table :pictures do |t|
      t.string :name
      t.references :imageable, polymorphic: true, index: true
      t.timestamps null: false
    end
  end
end
2.10 自連接
在設計資料 Model 時會發現,有時會需要自己與自己有關係的 Model。舉例來說,可能會想把員工資料通通存在一張資料表,但又要能夠追蹤像是經理或下屬之間的關係。這種情況可以使用自連接(Self join)關聯:
class Employee < ActiveRecord::Base
  has_many :subordinates, class_name: "Employee",
                          foreign_key: "manager_id"

  belongs_to :manager, class_name: "Employee"
end
這麼設定好後,可以使用 @employee.subordinates 與 @employee.manager 來取出經理與下屬。
在遷移裡則是需要加入參照自己的欄位:
class CreateEmployees < ActiveRecord::Migration
  def change
    create_table :employees do |t|
      t.references :manager
      t.timestamps null: false
    end
  end
end
3 秘訣、技巧與注意事項
以下是在 Rails 裡有效使用 Active Record 關聯所需要知道的二三事:
- 控制快取
- 避免命名衝突
- 更新資料庫綱要
- 控制關聯作用域
- 雙向關聯
3.1 控制快取
所有關聯新增的方法皆圍繞著快取打轉。這些方法會保留最近的查詢結果,供之後的查詢使用。快取甚至可在方法之間共享,比如:
customer.orders        # 從資料庫取出訂單,快取之。
customer.orders.size   # 使用快取的訂單查詢數量
customer.orders.empty? # 使用快取的訂單檢查是否為空
但要是應用程式某部分更新了資料,想重載快取呢?呼叫關聯方法時傳入 true 即可:
customer.orders              # 從資料庫取出訂單,快取。
customer.orders.size         # 使用快取的訂單查詢數量
customer.orders(true).empty? # 捨棄快取的訂單,重新去資料庫取出訂單,檢查是否為空。
3.2 避免命名衝突
關聯名稱不可隨意使用。因為在建立關聯時,會新增與關聯名稱相同的方法。若是關聯名稱與 ActiveRecord::Base 的實體方法相同時,關聯新增的方法會覆蓋掉 ActiveRecord::Base 的實體方法。比如 attributes 或 connection 是不好的關聯名稱。
3.3 更新資料庫綱要
關聯非常非常有用,但沒什麼神奇的。為關聯維護對應的資料庫綱要是開發者的責任。不同關聯需要做的事不同。對於 belongs_to 關聯來說,需要建立外鍵;對於 has_and_belongs_to_many 則需要建立適當的連接資料表。
3.3.1 為 belongs_to 關聯建立外鍵
當宣告了 belongs_to 關聯時,需要建立外鍵。看看下面這個 Model:
class Order < ActiveRecord::Base
  belongs_to :customer
end
仍需要在訂單資料表,建立適當的外鍵才有效:
class CreateOrders < ActiveRecord::Migration
  def change
    create_table :orders do |t|
      t.datetime :order_date
      t.string   :order_number
      t.integer  :customer_id
    end

    add_index :orders, :customer_id
  end
end
若在建立 Model 之後才宣告關聯,記得使用 add_column 遷移,來提供所需的外鍵。
3.3.2 為 has_and_belongs_to_many 關聯建立連接資料表
如果建立了 has_and_belongs_to_many 關聯,需要明確的建一張連接表。除非資料表已在 :join_table 選項中指定,否則 Active Record 會以關聯的類別名稱,依照詞法先後順序來命名這張連接資料表。假設有 Customer 與 Order Model ,則預設的連接表名稱是 customers_orders,因為在詞法順序當中,c 的地位高於 o。
Model 名稱的優先順序使用 String 的 < 來計算。若字串不一樣長,比較最短長度時,兩個字串是相等的。但長字串詞法地位高於短字串。舉例來說,你可能認為 paper_boxes 與 papers 這兩個資料表產生的連接表名稱是 papers_paper_boxes,因為 paper_boxes 比 papers 長。但實際上是 paper_boxes_papers,因為在常見的編碼裡,_ 的詞法地位高於 s。
不論名稱為何,必須要在適當的遷移中,手動產生連接表。考慮下面的關聯範例:
class Assembly < ActiveRecord::Base
  has_and_belongs_to_many :parts
end

class Part < ActiveRecord::Base
  has_and_belongs_to_many :assemblies
end
關聯要有效,還需寫一個遷移來建立 assemblies_parts 資料表。並且此表無主鍵:
class CreateAssembliesPartsJoinTable < ActiveRecord::Migration
  def change
    create_table :assemblies_parts, id: false do |t|
      t.integer :assembly_id
      t.integer :part_id
    end

    add_index :assemblies_parts, :assembly_id
    add_index :assemblies_parts, :part_id
  end
end
create_table 傳入 id: false 是因為,資料表無需表示一個 Model。這張資料表只是為了讓關聯可以正常工作。如果發現 has_and_belongs_to_many 關聯,出現任何奇怪的行為,像是 ID 錯位、ID 衝突,很可能就是因為忘記去掉主鍵。
3.4 控制關聯作用域
預設關聯只會在目前模組的作用域裡尋找物件。這在模組裡宣告 Active Record Model 時很重要,比如:
module MyApplication
  module Business
    class Supplier < ActiveRecord::Base
       has_one :account
    end

    class Account < ActiveRecord::Base
       belongs_to :supplier
    end
  end
end
這沒什麼問題,因為 Supplier 與 Account 在相同的作用域裡定義。但以下不會正常工作,因為 Supplier 與 Account 定義在不同的作用域裡。
module MyApplication
  module Business
    class Supplier < ActiveRecord::Base
       has_one :account
    end
  end

  module Billing
    class Account < ActiveRecord::Base
       belongs_to :supplier
    end
  end
end
要將不同命名空間下的 Model 關聯起來,可以在宣告關聯時,指定完整的類別名稱:
module MyApplication
  module Business
    class Supplier < ActiveRecord::Base
       has_one :account,
        class_name: "MyApplication::Billing::Account"
    end
  end

  module Billing
    class Account < ActiveRecord::Base
       belongs_to :supplier,
        class_name: "MyApplication::Business::Supplier"
    end
  end
end
3.5 雙向關聯
關聯兩邊都可以工作是很常見的需求,這需要在兩邊都宣告:
class Customer < ActiveRecord::Base
  has_many :orders
end

class Order < ActiveRecord::Base
  belongs_to :customer
end
Active Record 預設不知道這些關聯的連結關係。這可能會導致複製一個物件的不同步:
c = Customer.first
o = c.orders.first
c.first_name == o.customer.first_name # => true
c.first_name = 'Manny'
c.first_name == o.customer.first_name # => false
之所以會這樣的原因是,c 與 o.customer 在記憶體裡是表示相同資料的兩種表示,改了一個不會自動改另一個。Active Record 提供了 inverse_of 選項,用來通知 Rails 關聯之間的關係:
class Customer < ActiveRecord::Base
  has_many :orders, inverse_of: :customer
end

class Order < ActiveRecord::Base
  belongs_to :customer, inverse_of: :orders
end
加上了 inverse_of 後,Active Record 只會載入一個顧客物件,除了避免資料的不一致,還能提高應用程式的效率:
c = Customer.first
o = c.orders.first
c.first_name == o.customer.first_name # => true
c.first_name = 'Manny'
c.first_name == o.customer.first_name # => true
inverse_of 有幾點限制:
- 不能與
:through關聯同時使用。 - 不能與
:polymorphic關聯同時使用。 - 不能與
:as選項同時使用。 - 對
belongs_to關聯,會忽略has_many所設定的inverse_of。
每種關聯皆會試著自動找到對應的關聯,並根據關聯名稱來合理地設定 :inverse_of 選項。多數使用標準名稱的關聯都會自動設定。但使用了以下選項的關聯,則無法自動設定:
:conditions:through:polymorphic:foreign_key
4 關聯完整參考手冊
以下小節將完整給出每種關聯的細節,關聯新增的方法、宣告時可用的選項。
4.1 belongs_to 關聯參考手冊
belongs_to 關聯建立兩個 Model 之間的一對一關係。用資料庫的術語解釋,宣告 belongs_to 的這個類別有外鍵。若外鍵在另個類別,則應該使用 has_one 才是。
4.1.1 belongs_to 關聯新增的方法
宣告 belongs_to 關聯時,宣告的類別獲得五個關聯方法:
association(force_reload = false)association=(associate)build_association(attributes = {})create_association(attributes = {})create_association!(attributes = {})
以上所有方法,association 會換成作為第一個參數傳給 belongs_to 的符號。比如:
class Order < ActiveRecord::Base
  belongs_to :customer
end
現在每個 Order Model 的實體會有這些方法:
customer
customer=
build_customer
create_customer
create_customer!
在初始化 has_one 或 belongs_to 關聯時,必須使用 build_ 前綴的方法來新建關聯,而不是使用 has_many 或 has_and_belongs_to_many 關聯的 association.build 方法。要建立並存入資料庫,則使用 create_ 前綴的方法。
4.1.1.1 association(force_reload = false)
關聯物件存在時,association 方法回傳關聯物件。沒有找到關聯物件時,回傳 nil。
@customer = @order.customer
如果關聯物件已從資料庫取出,則會回傳此物件的快取版本。要強制重新從資料庫讀取,將 force_reload 參數設為 true。
4.1.1.2 association=(associate)
association= 方法指定關聯的物件。背後的工作原理是,把物件的外鍵欄位設成關聯物件的主鍵。
@order.customer = @customer
4.1.1.3 build_association(attributes = {})
build_association 方法回傳關聯類型的新物件。這個物件透過傳入的屬性來初始化,同時會自動設定外鍵。但關聯物件仍未儲存至資料庫。
@customer = @order.build_customer(customer_number: 123,
                                  customer_name: "John Doe")
4.1.1.4 create_association(attributes = {})
create_association 方法回傳關聯類型的新物件。 這個物件透過傳入的屬性來初始化,同時會自動設定外鍵。一旦通過所有 Model 的驗證規則時,便把此關聯物件存入資料庫。
@customer = @order.create_customer(customer_number: 123,
                                   customer_name: "John Doe")
4.1.1.5 create_association!(attributes = {})
與 create_association 方法相同,但在驗證失敗時會拋出 ActiveRecord::RecordInvalid 異常。
4.1.2 belongs_to 關聯可用選項
Rails 聰明的預設設定足夠應付多數場景,但總會有需要客製化 belongs_to 關聯行為的時候。這種時候透過傳入選項,以及建立關聯時傳入作用域區塊便可輕易完成。舉例來說,下面的關聯使用了兩個選項:
class Order < ActiveRecord::Base
  belongs_to :customer, dependent: :destroy,
                        counter_cache: true
end
belongs_to 關聯支援以下選項:
:autosave:class_name:counter_cache:dependent:foreign_key:inverse_of:polymorphic:touch:validate
4.1.2.1 :autosave
若 autosave 選項為 true,Rails 會在儲存父物件時,自動保存子物件。如子物件標記為刪除,也會在儲存時自動刪除。
4.1.2.2 :class_name
如果關聯 Model 名稱推論不出來時,可以使用 :class_name 選項來指定。舉例來說,訂單屬於顧客,但顧客的 Model 名是 Patron,則可以這麼指定:
class Order < ActiveRecord::Base
  belongs_to :customer, class_name: "Patron"
end
4.1.2.3 :counter_cache
:counter_cache 選項可以更有效的找出所屬物件的數量。
class Order < ActiveRecord::Base
  belongs_to :customer
end
class Customer < ActiveRecord::Base
  has_many :orders
end
如上宣告關聯後,詢問 @customer.orders.size 需要對資料庫下一條 COUNT(*) 查詢。要避免此操作,可以在 belongs_to 的 Model 加上 counter_cache: true。
class Order < ActiveRecord::Base
  belongs_to :customer, counter_cache: true
end
class Customer < ActiveRecord::Base
  has_many :orders
end
如此一來 Rails 確保快取是最新的,並對 size 方法回傳快取的值。
雖然 :counter_cache 在 belongs_to 的 Model 裡指定。但實際的欄位必須加在關聯的 Model。上例則是需要在 Customer Model 加入 orders_count 欄位。欄位名稱需要與預設不同的的話可以:
class Order < ActiveRecord::Base
  belongs_to :customer, counter_cache: :count_of_orders
end
class Customer < ActiveRecord::Base
  has_many :orders
end
Counter Cache 欄位透過 attr_readonly 加到關聯模型的唯讀列表裡。
4.1.2.4 :dependent
:dependent 選項可設為:
-
:destroy:物件刪除時,會對關聯物件呼叫destroy。 -
:delete:物件刪除時,不會對關聯物件呼叫destroy,而是直接從資料庫中刪除。
不應該在與 has_many 連結的 belongs_to 關聯裡使用此選項。會導致資料庫出現孤兒記錄。
4.1.2.5 :foreign_key
Rails 的外鍵慣例是關聯的 Model 名稱加上 _id 後綴。:foreign_key 選項可以修改外鍵名稱:
class Order < ActiveRecord::Base
  belongs_to :customer, class_name: "Patron",
                        foreign_key: "patron_id"
end
所有情況下,Rails 都不會幫您建立外鍵。需要自己在遷移中明確定義外鍵。
4.1.2.6 :inverse_of
:inverse_of 選項指定 belongs_to 關聯另一端的關聯名稱。無法與 :polymorphic 同時使用。
class Customer < ActiveRecord::Base
  has_many :orders, inverse_of: :customer
end

class Order < ActiveRecord::Base
  belongs_to :customer, inverse_of: :orders
end
4.1.2.7 :polymorphic
:polymorphic 為 true 時,表示這是個多型關聯。多型關聯在前面已詳細介紹過。
4.1.2.8 :touch
touch 為 true 時,儲存或刪除關聯物件時,關聯物件的 updated_at 或 updated_on 的時間戳會自動設成當前時間。
class Order < ActiveRecord::Base
  belongs_to :customer, touch: true
end

class Customer < ActiveRecord::Base
  has_many :orders
end
上例刪除或儲存訂單時,都會更新相關顧客的時間戳。可以指定要更新的時間戳欄位:
class Order < ActiveRecord::Base
  belongs_to :customer, touch: :orders_updated_at
end
4.1.2.9 :validate
若 :validate 設為 true,則關聯物件會在儲存時觸發驗證。預設為 false,儲存物件時不會驗證關聯物件。
4.1.3 belongs_to 的作用域
有時候可能想客製化 belongs_to 使用的查詢語句。可以透過傳入作用域區塊來達到,比如:
class Order < ActiveRecord::Base
  belongs_to :customer, -> { where active: true },
                        dependent: :destroy
end
作用域區塊裡可以使用任何標準的查詢方法。以下分別介紹這幾個方法:
whereincludesreadonlyselect
4.1.3.1 where
where 方法指定關聯物件必須滿足的條件。
class Order < ActiveRecord::Base
  belongs_to :customer, -> { where active: true }
end
4.1.3.2 includes
includes 方法用來指定需要 Eager Loading 的第二層關聯。看看下面這個例子:
class LineItem < ActiveRecord::Base
  belongs_to :order
end

class Order < ActiveRecord::Base
  belongs_to :customer
  has_many :line_items
end

class Customer < ActiveRecord::Base
  has_many :orders
end
若需要頻繁地從訂單細目裡取出顧客(@line_item.order.customer),那麼在 LineItem 的 belongs_to 關聯裡載入顧客,程式會更有效率:
class LineItem < ActiveRecord::Base
  belongs_to :order, -> { includes :customer }
end

class Order < ActiveRecord::Base
  belongs_to :customer
  has_many :line_items
end

class Customer < ActiveRecord::Base
  has_many :orders
end
直接關聯不需要使用 includes,比如 Order belongs_to :customer,則預設會 Eager Loading 顧客。
4.1.3.3 readonly
如果設定了 readonly 選項,則關聯物件取出時為唯讀。
4.1.3.4 select
select 方法可以覆寫用來取出關聯的 SELECT 子句。預設會取出所有欄位。
若對 belongs_to 關聯使用了 select 方法,則應該要設定 :foreign_key 選項確保結果是正確的。
4.1.4 檢查關聯物件是否存在?
使用 association.nil? 來檢查關聯物件是否存在:
if @order.customer.nil?
  @msg = "No customer found for this order"
end
4.1.5 物件何時被儲存?
把物件賦值給 belongs_to 關聯不會自動儲存物件,也不會儲存關聯的物件。
4.2 has_one 關聯參考手冊
has_one 關聯建立兩個 Model 之間的一對一關係。用資料庫的術語解釋,宣告 has_one 的這個類別沒有外鍵。若外鍵在這個類別,則應該使用 belongs_to 才是。
4.2.1 has_one 關聯新增的方法
宣告 has_one 關聯時,宣告的類別獲得五個關聯方法:
association(force_reload = false)association=(associate)build_association(attributes = {})create_association(attributes = {})create_association!(attributes = {})
以上所有方法,association 會換成作為第一個參數傳給 has_one 的符號。比如:
class Supplier < ActiveRecord::Base
  has_one :account
end
現在每個 Supplier Model 的實體會有這些方法:
account
account=
build_account
create_account
create_account!
在初始化 has_one 或 belongs_to 關聯時,必須使用 build_ 前綴的方法來新建關聯,而不是使用 has_many 或 has_and_belongs_to_many 關聯的 association.build 方法。要建立並存入資料庫,則使用 create_ 前綴的方法。
4.2.1.1 association(force_reload = false)
關聯物件存在時,association 方法回傳關聯物件。沒有找到關聯物件時,回傳 nil。
@account = @supplier.account
如果關聯物件已從資料庫取出,則會回傳此物件的快取版本。要強制重新從資料庫讀取,將 force_reload 參數設為 true。
4.2.1.2 association=(associate)
association= 方法指定關聯的物件。背後的工作原理是,把物件的外鍵欄位設成關聯物件的主鍵。
@supplier.account = @account
4.2.1.3 build_association(attributes = {})
build_association 方法回傳關聯類型的新物件。這個物件透過傳入的屬性來初始化,同時會自動設定外鍵。但關聯物件仍未儲存至資料庫。
@account = @supplier.build_account(terms: "Net 30")
4.2.1.4 create_association(attributes = {})
create_association 方法回傳關聯類型的新物件。 這個物件透過傳入的屬性來初始化,同時會自動設定外鍵。一旦通過所有 Model 的驗證規則時,便把此關聯物件存入資料庫。
@account = @supplier.create_account(terms: "Net 30")
4.2.1.5 create_association!(attributes = {})
與 create_association 方法相同,但在驗證失敗時會拋出 ActiveRecord::RecordInvalid 異常。
4.2.2 has_one 關聯可用選項
Rails 聰明的預設設定足夠應付多數場景,但總會有需要客製化 has_one 關聯行為的時候。這種時候透過傳入選項,以及建立關聯時傳入作用域區塊便可輕易完成。舉例來說,下面的關聯使用了兩個選項:
class Supplier < ActiveRecord::Base
  has_one :account, class_name: "Billing", dependent: :nullify
end
has_one 關聯支援以下選項:
:as:autosave:class_name:dependent:foreign_key:inverse_of:primary_key:source:source_type:through:validate
4.2.2.1 :as
設定 :as 選項表示這是一個多型關聯。多型關聯在前面已詳細介紹過。
4.2.2.2 :autosave
若 autosave 選項為 true,Rails 會在儲存父物件時,自動保存子物件。如子物件標記為刪除,也會在儲存時自動刪除。
4.2.2.3 :class_name
如果關聯 Model 名稱推論不出來時,可以使用 :class_name 選項來指定。舉例來說,訂單屬於顧客,但顧客的 Model 名是 Billing,則可以這麼指定:
class Supplier < ActiveRecord::Base
  has_one :account, class_name: "Billing"
end
4.2.2.4 :dependent
在刪除關聯物件擁有者時該如何處理關聯物件:
-
:destroy:同時刪除關聯物件。 -
:delete:直接將關聯物件從資料庫刪除,不會執行回呼。 -
:nullify:把外鍵設為NULL,不會執行回呼。 -
:restrict_with_exception:有關聯物件的話,向擁有者拋出異常。 -
:restrict_with_error:有關聯物件的話,向擁有者拋出錯誤。
若在資料庫設定了 NOT NULL 約束條件,則不要使用 :nullify。此時若沒有把 :dependent 設為 destroy,會無法修改關聯物件,因為原本關聯物件的外鍵會被設為不允許的 NULL。
4.2.2.5 :foreign_key
Rails 的外鍵慣例是關聯的 Model 名稱加上 _id 後綴。:foreign_key 選項可以修改外鍵名稱:
class Supplier < ActiveRecord::Base
  has_one :account, foreign_key: "supp_id"
end
所有情況下,Rails 都不會幫您建立外鍵。需要自己在遷移中明確定義外鍵。
4.2.2.6 :inverse_of
:inverse_of 選項指定 has_one 關聯另一端的關聯名稱。無法與 :through 或 :as 同時使用。
class Supplier < ActiveRecord::Base
  has_one :account, : :supplier
end

class Account < ActiveRecord::Base
  belongs_to :supplier, inverse_of: :account
end
4.2.2.7 :primary_key
Rails 的主鍵慣例是 id。可以使用 :primary_key 選項來修改主鍵名稱。
4.2.2.8 :source
:source 選項給 has_one :through 關聯指定來源關聯名稱。
4.2.2.9 :source_type
:source_type 選項給透過多型關聯的 has_one :through 關聯指定來源類型。
4.2.2.10 :through
:through 選項用來指定下查詢的連接表。has_one :through 關聯在前面已詳細介紹過。
4.2.2.11 :validate
若 :validate 設為 true,則關聯物件會在儲存時觸發驗證。預設為 false,儲存物件時不會驗證關聯物件。
4.2.3 has_one 的作用域
有時候可能想客製化 has_one 使用的查詢語句。可以透過傳入作用域區塊來達到,比如:
class Supplier < ActiveRecord::Base
  has_one :account, -> { where active: true }
end
作用域區塊裡可以使用任何標準的查詢方法。以下分別介紹這幾個方法:
whereincludesreadonlyselect
4.2.3.1 where
where 方法指定關聯物件必須滿足的條件。
class Supplier < ActiveRecord::Base
  has_one :account, -> { where "confirmed = 1" }
end
4.2.3.2 includes
includes 方法用來指定需要 Eager Loading 的第二層關聯。看看下面這個例子:
class Supplier < ActiveRecord::Base
  has_one :account
end

class Account < ActiveRecord::Base
  belongs_to :supplier
  belongs_to :representative
end

class Representative < ActiveRecord::Base
  has_many :accounts
end
若需要頻繁地從供應商裡取出代表人(@supplier.account.representative),那麼在 Supplier 的 has_one 關聯裡載入代表人,程式會更有效率:
class Supplier < ActiveRecord::Base
  has_one :account, -> { includes :representative }
end

class Account < ActiveRecord::Base
  belongs_to :supplier
  belongs_to :representative
end

class Representative < ActiveRecord::Base
  has_many :accounts
end
4.2.3.3 readonly
如果設定了 readonly 選項,則關聯物件取出時為唯讀。
4.2.3.4 select
select 方法可以覆寫用來取出關聯的 SELECT 子句。預設會取出所有欄位。
4.2.4 檢查關聯物件是否存在?
使用 association.nil? 來檢查關聯物件是否存在:
if @supplier.account.nil?
  @msg = "No account found for this supplier"
end
4.2.5 物件何時被儲存?
把物件賦值給 has_one 關聯會自動儲存物件(因為要更新外鍵)。除此之外,用來賦值的物件也會自動儲存,因為外鍵變了。
如果驗證失敗時,則賦值的敘述句會回傳 false,賦值也會被取消。
若父物件(有 has_one 的 Model)尚未儲存(new_record? 回傳 true),則不會儲存子物件。只有在父物件儲存時,才會儲存子物件。
若想給 has_one 關聯賦物件而不儲存,使用 association.build 方法。
4.3 has_many 關聯參考手冊
has_many 關聯建立兩個 Model 之間的一對多關係。用資料庫的術語解釋,宣告
has_many 的這個類別沒有外鍵。外鍵在與之關聯的類別,參照到這個類別的實體。
4.3.1 has_many 關聯新增的方法
宣告 has_many 關聯時,宣告的類別獲得 16 個關聯方法:
collection(force_reload = false)collection<<(object, ...)collection.delete(object, ...)collection.destroy(object, ...)collection=(objects)collection_singular_idscollection_singular_ids=(ids)collection.clearcollection.empty?collection.sizecollection.find(...)collection.where(...)collection.exists?(...)collection.build(attributes = {}, ...)collection.create(attributes = {})collection.create!(attributes = {})
以上所有方法,collection 會換成作為第一個參數傳給 has_many 的符號。而 collection_singular 會換成第一個參數傳給 has_many 的符號的單數形式。比如:
class Customer < ActiveRecord::Base
  has_many :orders
end
現在每個 Customer Model 的實體會有這些方法:
orders(force_reload = false)
orders<<(object, ...)
orders.delete(object, ...)
orders.destroy(object, ...)
orders=(objects)
order_ids
order_ids=(ids)
orders.clear
orders.empty?
orders.size
orders.find(...)
orders.where(...)
orders.exists?(...)
orders.build(attributes = {}, ...)
orders.create(attributes = {})
orders.create!(attributes = {})
4.3.1.1 collection(force_reload = false)
collection 會回傳包含所有關聯物件的陣列。沒有關聯物件時,回傳空陣列。
@orders = @customer.orders
4.3.1.2 collection<<(object, ...)
collection<< 方法透過將外鍵設為加入物件的主鍵,新增一個或多個物件到關聯集合。
@customer.orders << @order1
4.3.1.3 collection.delete(object, ...)
collection.delete 透過將外鍵設為 NULL,從關聯集合中移除一個或多個物件。
@customer.orders.delete(@order1)
除此之外,若關聯設定了 dependent: :destroy,則關聯物件會被 destroy;若關聯設定了 dependent: :delete_all,則關聯物件會被 delete。
4.3.1.4 collection.destroy(object, ...)
collection.destroy 方法透過對物件呼叫 destroy 來移除物件。
@customer.orders.destroy(@order1)
無論 :dependent 選項是什麼,物件都會從資料庫裡刪除。
4.3.1.5 collection=(objects)
collection= 方法更改集合內容,根據提供的物件來決定要刪除還是新增。
4.3.1.6 collection_singular_ids
collection_singular_ids 方法回傳集合陣列中各物件的 ID。
@order_ids = @customer.order_ids
4.3.1.7 collection_singular_ids=(ids)
collection_singular_ids= 方法更改集合擁有物件的 ID,根據所提供的主鍵值來決定要刪除還是新增。
4.3.1.8 collection.clear
collection.clear 方法移除集合中的所有物件。若有設定 dependent: :destroy 選項,則會 destory 關聯物件;若設定的是 dependent: :delete_all 選項,則會直接從資料庫刪除關聯物件;其他情況會將外鍵設為 NULL。
4.3.1.9 collection.empty?
collection.empty? 方法在集合沒有任何關聯物件時回傳 true。
<% if @customer.orders.empty? %>
  No Orders Found
<% end %>
4.3.1.10 collection.size
collection.size 方法回傳集合中物件的數量。
@order_count = @customer.orders.size
4.3.1.11 collection.find(...)
collection.find 方法在集合中查詢物件。語法和選項與 ActiveRecord::Base.find 相同。
@open_orders = @customer.orders.find(1)
4.3.1.12 collection.where(...)
collection.where 方法根據提供的條件來查找物件,預設是惰性載入,僅在需要用到物件才會去資料庫做查詢。
@open_orders = @customer.orders.where(open: true) # No query yet
@open_order = @open_orders.first # Now the database will be queried
4.3.1.13 collection.exists?(...)
collection.exists? 方法依提供的條件檢查物件存在集合裡。語法和選項與 ActiveRecord::Base.exists? 相同。
4.3.1.14 collection.build(attributes = {}, ...)
collection.build 方法回傳一個或多個新關聯物件。這些物件由傳入的屬性來初始化,同時會自動設定外鍵。但關聯物件仍未儲存至資料庫。
@order = @customer.orders.build(order_date: Time.now,
                                order_number: "A12345")
4.3.1.15 collection.create(attributes = {})
collection.create 方法回傳關聯類型的新物件。 這個物件透過傳入的屬性來初始化,同時會自動設定外鍵。一旦通過所有 Model 的驗證規則時,便把此關聯物件存入資料庫。
@order = @customer.orders.create(order_date: Time.now,
                                 order_number: "A12345")
4.3.1.16 collection.create!(attributes = {})
與 collection.create 方法相同,但在驗證失敗時會拋出 ActiveRecord::RecordInvalid 異常。
4.3.2 has_many 關聯可用選項
Rails 聰明的預設設定足夠應付多數場景,但總會有需要客製化 has_many 關聯行為的時候。這種時候透過傳入選項,以及建立關聯時傳入作用域區塊便可輕易完成。舉例來說,下面的關聯使用了兩個選項:
class Customer < ActiveRecord::Base
  has_many :orders, dependent: :delete_all, validate: :false
end
has_many 關聯支援以下選項:
:as:autosave:class_name:dependent:foreign_key:inverse_of:primary_key:source:source_type:through:validate
4.3.2.1 :as
設定 :as 選項表示這是一個多型關聯。多型關聯在前面已詳細介紹過。
4.3.2.2 :autosave
若 autosave 選項為 true,Rails 會在儲存父物件時,自動保存子物件。如子物件標記為刪除,也會在儲存時自動刪除。
4.3.2.3 :class_name
如果關聯 Model 名稱推論不出來時,可以使用 :class_name 選項來指定。舉例來說,顧客有許多訂單,但訂單的 Model 名是 Transaction,則可以這麼指定:
class Customer < ActiveRecord::Base
  has_many :orders, class_name: "Transaction"
end
4.3.2.4 :dependent
在刪除關聯物件擁有者時該如何處理關聯物件:
-
:destroy:同時刪除關聯物件。 -
:delete_all:直接將關聯物件從資料庫刪除,不會執行回呼。 -
:nullify:把外鍵設為NULL,不會執行回呼。 -
:restrict_with_exception:有關聯物件的話,向擁有者拋出異常。 -
:restrict_with_error:有關聯物件的話,向擁有者拋出錯誤。
關聯若使用了 :through 選項,則會忽略 :dependent 選項。
4.3.2.5 :foreign_key
Rails 的外鍵慣例是關聯的 Model 名稱加上 _id 後綴。:foreign_key 選項可以修改外鍵名稱:
class Customer < ActiveRecord::Base
  has_many :orders, foreign_key: "cust_id"
end
所有情況下,Rails 都不會幫您建立外鍵。需要自己在遷移中明確定義外鍵。
4.3.2.6 :inverse_of
:inverse_of 選項指定 belongs_to 關聯另一端的關聯名稱。無法與 :through 或 :as 同時使用。
class Customer < ActiveRecord::Base
  has_many :orders, inverse_of: :customer
end

class Order < ActiveRecord::Base
  belongs_to :customer, inverse_of: :orders
end
4.3.2.7 :primary_key
Rails 的主鍵慣例是 id。可以使用 :primary_key 選項來修改主鍵名稱。
假設 users 資料表的主鍵是 id,但同時擁有 guid 欄位。現在加入一個新的需求,todos 資料表,使用者的主鍵用 guid 來存,而不是 id 的話,可以這麼做:
class User < ActiveRecord::Base
  has_many :todos, primary_key: :guid
end
現在執行 @user.todos.create 時,@todo 的 user_id 是 @user 的 guid。
4.3.2.8 :source
:source 選項給 has_many :through 關聯指定來源關聯名稱。這個選項只有在來源關聯名稱無法自動推論出來的時候才使用。
4.3.2.9 :source_type
:source_type 選項給透過多型關聯的 has_many :through 關聯指定來源類型。
4.3.2.10 :through
:through 選項用來指定下查詢的連接表。has_many :through 關聯在前面已詳細介紹過。
4.3.2.11 :validate
若 :validate 設為 false,則關聯物件會在儲存時觸發驗證。預設為 true,會在儲存物件時驗證關聯物件。
4.3.3 has_many 的作用域
有時候可能想客製化 has_many 使用的查詢語句。可以透過傳入作用域區塊來達到,比如:
class Customer < ActiveRecord::Base
  has_many :orders, -> { where processed: true }
end
作用域區塊裡可以使用任何標準的查詢方法。以下分別介紹這幾個方法:
whereextendinggroupincludeslimitoffsetorderreadonlyselectuniq
4.3.3.1 where
where 方法指定關聯物件必須滿足的條件。
class Customer < ActiveRecord::Base
  has_many :confirmed_orders, -> { where "confirmed = 1" },
    class_name: "Order"
end
條件也可透過 Hash 指定:
class Customer < ActiveRecord::Base
  has_many :confirmed_orders, -> { where confirmed: true },
                              class_name: "Order"
end
若使用了 Hash 風格的 where 選項,產生出來的記錄會自動使用 Hash 的作用域。上例中,使用 @customer.confirmed_orders.create 或 @customer.confirmed_orders.build 會建立出 confirmed 欄位為 true 的訂單。
4.3.3.2 extending
extending 方法指定一個模組名稱,用來擴充關聯代理(association proxy)。 擴充關聯之後會詳細介紹。
4.3.3.3 group
group 方法提供一個屬性名稱,用在 SQL 的 GROUP BY 子句裡,用來對結果做分組。
class Customer < ActiveRecord::Base
  has_many :line_items, -> { group 'orders.id' },
                        through: :orders
end
4.3.3.4 includes
includes 方法用來指定需要 Eager Loading 的第二層關聯。看看下面這個例子:
class Customer < ActiveRecord::Base
  has_many :orders
end

class Order < ActiveRecord::Base
  belongs_to :customer
  has_many :line_items
end

class LineItem < ActiveRecord::Base
  belongs_to :order
end
若需要頻繁地從顧客裡取出訂單細目(@customer.orders.line_items),那麼在 Customer 的 has_many 關聯裡載入細目,程式會更有效率:
class Customer < ActiveRecord::Base
  has_many :orders, -> { includes :line_items }
end

class Order < ActiveRecord::Base
  belongs_to :customer
  has_many :line_items
end

class LineItem < ActiveRecord::Base
  belongs_to :order
end
4.3.3.5 limit
limit 方法可限制透過關聯取出物件的數量。
class Customer < ActiveRecord::Base
  has_many :recent_orders,
    -> { order('order_date desc').limit(100) },
    class_name: "Order",
end
4.3.3.6 offset
offset 方法可指定開始從關聯取出物件的偏移量。比如 -> { offset(11) } 會忽略前 11 個物件。
4.3.3.7 order
order 方法指定關聯物件取出後的排序方式(語法為 SQL 的 ORDER BY 子句)。
class Customer < ActiveRecord::Base
  has_many :orders, -> { order "date_confirmed DESC" }
end
4.3.3.8 readonly
如果設定了 readonly 選項,則關聯物件取出時為唯讀。
4.3.3.9 select
select 方法可以覆寫用來取出關聯的 SELECT 子句。預設會取出所有欄位。
若使用了 select,記得要選出關聯的主鍵與外鍵欄位,否則 Rails 會拋出錯誤。
4.3.3.10 distinct
distinct 方法確保集合中沒有重複的物件。與 :through 選項時使用最有用。
class Person < ActiveRecord::Base
  has_many :readings
  has_many :articles, through: :readings
end

person = Person.create(name: 'John')
article   = Article.create(name: 'a1')
person.articles << a
person.articles << a
person.articles.inspect # => [#<Article id: 5, name: "a1">, #<Article id: 5, name: "a1">]
Reading.all.inspect  # => [#<Reading id: 12, person_id: 5, article_id: 5>, #<Reading id: 13, person_id: 5, article_id: 5>]
上例中,人有兩篇文章要讀,雖然這兩篇是相同的文章,但 person.articles 會回傳兩篇文章。
使用 distinct:
class Person
  has_many :readings
  has_many :articles, -> { distinct }, through: :readings
end

person = Person.create(name: 'Honda')
article   = Article.create(name: 'a1')
person.articles << article
person.articles << article
person.articles.inspect # => [#<Article id: 7, name: "a1">]
Reading.all.inspect  # => [#<Reading id: 16, person_id: 7, article_id: 7>, #<Reading id: 17, person_id: 7, article_id: 7>]
上例仍有兩篇文章要讀,但 person.articles 僅回傳一篇文章,因為集合只載入唯一的記錄。
若想確保不插入重複的資料到資料庫(這樣取出來就確定是不重複的記錄了),應該要在資料表上新增一個唯一性的索引。舉例來說,如果有 person_articles 資料表,想確保所有文章不重複,可加入下面這個遷移:
add_index :person_articles, :article, unique: true
使用 include? 來檢唯一性可能會導致競態條件(Race Condition)。不要使用 include? 來確保集合的唯一性。同樣以前面文章為例,以下的程式碼會導致競態條件,因為多個使用者可能同時加入文章:
person.articles << article unless person.articles.include?(article)
4.3.4 物件何時被儲存?
把物件賦值給 has_many 關聯會自動儲存物件(因為要更新外鍵)。除此之外,用來賦值的物件也會自動儲存,因為外鍵變了。
如果驗證失敗時,則賦值的敘述句會回傳 false,賦值也會被取消。
若父物件(有 has_many 的 Model)尚未儲存(new_record? 回傳 true),則不會儲存子物件。只有在父物件儲存時,才會儲存子物件。
若想給 has_many 關聯賦物件而不儲存,使用 collection.build 方法。
4.4 has_and_belongs_to_many 關聯參考手冊
has_and_belongs_to_many 關聯建立兩個 Model 之間的多對多關係。用資料庫的術語解釋,透過直接的連接資料表將兩個 Model 關聯起來,連接資料表記錄了兩個類別的外鍵。
4.4.1 has_and_belongs_to_many 關聯新增的方法
宣告 has_and_belongs_to_many 關聯時,宣告的類別獲得 16 個關聯方法:
collection(force_reload = false)collection<<(object, ...)collection.delete(object, ...)collection.destroy(object, ...)collection=(objects)collection_singular_idscollection_singular_ids=(ids)collection.clearcollection.empty?collection.sizecollection.find(...)collection.where(...)collection.exists?(...)collection.build(attributes = {})collection.create(attributes = {})collection.create!(attributes = {})
以上所有方法,collection 會換成作為第一個參數傳給 has_and_belongs_to_many 的符號。而 collection_singular 會換成第一個參數傳給 has_and_belongs_to_many 的符號的單數形式。比如:
class Part < ActiveRecord::Base
  has_and_belongs_to_many :assemblies
end
現在每個 Part Model 的實體會有這些方法:
assemblies(force_reload = false)
assemblies<<(object, ...)
assemblies.delete(object, ...)
assemblies.destroy(object, ...)
assemblies=(objects)
assembly_ids
assembly_ids=(ids)
assemblies.clear
assemblies.empty?
assemblies.size
assemblies.find(...)
assemblies.where(...)
assemblies.exists?(...)
assemblies.build(attributes = {}, ...)
assemblies.create(attributes = {})
assemblies.create!(attributes = {})
4.4.1.1 額外的欄位方法
若 has_and_belongs_to_many 關聯的連接資料表除了外鍵外,還有其他欄位時,這些欄位會新增到取出的關聯裡,變成關聯的屬性。這些額外的欄位是唯讀的,因為 Rails 無從得知如何儲存這些屬性的變動。
在 has_and_belongs_to_many 關聯的連接資料表裡使用額外的欄位已棄用。若多對多關係需要如此複雜的行為,應該使用 `has_many :through 關聯。.
4.4.1.2 collection(force_reload = false)
collection 會回傳包含所有關聯物件的陣列。沒有關聯物件時,回傳空陣列。
@assemblies = @part.assemblies
4.4.1.3 collection<<(object, ...)
collection<< 方法透過在連接資料表裡新增記錄,來新增一個或多個物件至集合。
@part.assemblies << @assembly1
這個方法是 collection.concat 與 collection.push 的別名。
4.4.1.4 collection.delete(object, ...)
collection.delete 方法透過刪除連接資料表中的記錄,來移除集合中一個或多個物件。但並不會刪除關聯物件。
@part.assemblies.delete(@assembly1)
不會觸發連接資料表記錄的回呼。
4.4.1.5 collection.destroy(object, ...)
collection.destroy 方法透過對連接資料表的物件呼叫 destroy,包含回呼,來移除集合中一個或多個物件。但並不會刪除關聯物件。
@part.assemblies.destroy(@assembly1)
4.4.1.6 collection=(objects)
collection= 方法更改集合內容,根據提供的物件來決定要刪除還是新增。
4.4.1.7 collection_singular_ids
collection_singular_ids 方法回傳集合陣列中各物件的 ID。
@assembly_ids = @part.assembly_ids
4.4.1.8 collection_singular_ids=(ids)
collection_singular_ids= 方法更改集合擁有物件的 ID,根據所提供的主鍵值來決定要刪除還是新增。
4.4.1.9 collection.clear
collection.clear 方法透過刪除連接資料表的列來移除集合中的所有物件。但並不會刪除關聯物件。
4.4.1.10 collection.empty?
collection.empty? 方法在集合沒有任何關聯物件時回傳 true。
<% if @part.assemblies.empty? %>
  This part is not used in any assemblies
<% end %>
4.4.1.11 collection.size
collection.size 方法回傳集合中物件的數量。
@assembly_count = @part.assemblies.size
4.4.1.12 collection.find(...)
collection.find 方法在集合中查詢物件。語法和選項與 ActiveRecord::Base.find 相同。同時加入了另外一條條件,物件必須在集合裡。
@assembly = @part.assemblies.find(1)
4.4.1.13 collection.where(...)
collection.where 方法根據提供的條件來查找物件,預設是惰性載入,僅在需要用到物件才會去資料庫做查詢。同時加入了另外一條條件,物件必須在集合裡。
@new_assemblies = @part.assemblies.where("created_at > ?", 2.days.ago)
4.4.1.14 collection.exists?(...)
collection.exists? 方法依提供的條件檢查物件存在集合裡。語法和選項與 ActiveRecord::Base.exists? 相同。
4.4.1.15 collection.build(attributes = {})
collection.build 方法回傳一個或多個新關聯物件。這些物件由傳入的屬性來初始化,自動在連接資料表建立新記錄,並設定好外鍵。但關聯物件仍未儲存至資料庫。
@assembly = @part.assemblies.build({assembly_name: "Transmission housing"})
4.4.1.16 collection.create(attributes = {})
collection.create 方法回傳關聯類型的新物件。 這個物件透過傳入的屬性來初始化,自動在連接資料表建立新記錄,並設定好外鍵。一旦通過所有 Model 的驗證規則時,便把此關聯物件存入資料庫。
@assembly = @part.assemblies.create({assembly_name: "Transmission housing"})
4.4.1.17 collection.create!(attributes = {})
與 collection.create 方法相同,但在驗證失敗時會拋出 ActiveRecord::RecordInvalid 異常。
4.4.2 has_and_belongs_to_many 關聯可用選項
Rails 聰明的預設設定足夠應付多數場景,但總會有需要客製化 has_and_belongs_to_many 關聯行為的時候。這種時候透過傳入選項,以及建立關聯時傳入作用域區塊便可輕易完成。舉例來說,下面的關聯使用了兩個選項:
class Parts < ActiveRecord::Base
  has_and_belongs_to_many :assemblies, autosave: true,
                                       readonly: true
end
has_and_belongs_to_many 關聯支援以下選項:
:association_foreign_key:autosave:class_name:foreign_key:join_table:validate:readonly
4.4.2.1 :association_foreign_key
依照慣例,Rails 假定連接資料表的外鍵名稱為 Model 名稱加上 _id 後綴。association_foreign_key 可以直接修改外鍵名稱:
:foreign_key 與 :association_foreign_key 選項在設定自連接的多對多關係時很有用,譬如:
class User < ActiveRecord::Base
  has_and_belongs_to_many :friends,
      class_name: "User",
      foreign_key: "this_user_id",
      association_foreign_key: "other_user_id"
end
4.4.2.2 :autosave
若 autosave 選項為 true,Rails 會在儲存父物件時,自動保存子物件。如子物件標記為刪除,也會在儲存時自動刪除。
4.4.2.3 :class_name
如果關聯 Model 名稱推論不出來時,可以使用 :class_name 選項來指定。舉例來說,部件屬於組件,但組件的 Model 名是 Gadget,則可以這麼指定:
class Parts < ActiveRecord::Base
  has_and_belongs_to_many :assemblies, class_name: "Gadget"
end
4.4.2.4 :foreign_key
Rails 的外鍵慣例是關聯的 Model 名稱加上 _id 後綴。:foreign_key 選項可以修改外鍵名稱:
class User < ActiveRecord::Base
  has_and_belongs_to_many :friends,
      class_name: "User",
      foreign_key: "this_user_id",
      association_foreign_key: "other_user_id"
end
4.4.2.5 :join_table
資料連接表的名稱,基於詞法序推出。若想變更名稱可使用 :join_table 選項來覆蓋掉預設值。
4.4.2.6 :validate
若 :validate 設為 false,則關聯物件會在儲存時觸發驗證。預設為 true,會在儲存物件時驗證關聯物件。
4.4.3 has_and_belongs_to_many 的作用域
有時候可能想客製化 has_and_belongs_to_many 使用的查詢語句。可以透過傳入作用域區塊來達到,比如:
class Parts < ActiveRecord::Base
  has_and_belongs_to_many :assemblies, -> { where active: true }
end
作用域區塊裡可以使用任何標準的查詢方法。以下分別介紹這幾個方法:
whereextendinggroupincludeslimitoffsetorderreadonlyselectuniq
4.4.3.1 where
where 方法指定關聯物件必須滿足的條件。
class Parts < ActiveRecord::Base
  has_and_belongs_to_many :assemblies,
    -> { where "factory = 'Seattle'" }
end
條件也可透過 Hash 指定:
class Parts < ActiveRecord::Base
  has_and_belongs_to_many :assemblies,
    -> { where factory: 'Seattle' }
end
若使用了 Hash 風格的 where 選項,產生出來的記錄會自動使用 Hash 的作用域。上例中,使用 @parts.assemblies.create 或 @parts.assemblies.build 會建立出 factory 欄位為 'Seattle' 的訂單。
4.4.3.2 extending
extending 方法指定一個模組名稱,用來擴充關聯代理(association proxy)。 擴充關聯之後會詳細介紹。
4.4.3.3 group
group 方法提供一個屬性名稱,用在 SQL 的 GROUP BY 子句裡,用來對結果做分組。
class Parts < ActiveRecord::Base
  has_and_belongs_to_many :assemblies, -> { group "factory" }
end
4.4.3.4 includes
includes 方法用來指定需要 Eager Loading 的第二層關聯。看看下面這個例子:
4.4.3.5 limit
limit 方法可限制透過關聯取出物件的數量。
class Parts < ActiveRecord::Base
  has_and_belongs_to_many :assemblies,
    -> { order("created_at DESC").limit(50) }
end
4.4.3.6 offset
offset 方法可指定開始從關聯取出物件的偏移量。比如 -> { offset(11) } 會忽略前 11 個物件。
4.4.3.7 order
order 方法指定關聯物件取出後的排序方式(語法為 SQL 的 ORDER BY 子句)。
class Parts < ActiveRecord::Base
  has_and_belongs_to_many :assemblies,
    -> { order "assembly_name ASC" }
end
4.4.3.8 readonly
如果設定了 readonly 選項,則關聯物件取出時為唯讀。
4.4.3.9 select
select 方法可以覆寫用來取出關聯的 SELECT 子句。預設會取出所有欄位。
4.4.3.10 uniq
uniq 方法用來移除集合裡重複的物件。
4.4.4 物件何時被儲存?
把物件賦值給 has_and_belongs_to_many 關聯會自動儲存物件(因為要更新資料連接表)。一次賦值多個物件,所有的物件都會被儲存。
如果驗證失敗時,則賦值的敘述句會回傳 false,賦值也會被取消。
若父物件(有 has_and_belongs_to_many 的 Model)尚未儲存(new_record? 回傳 true),則不會儲存子物件。只有在父物件儲存時,才會儲存子物件。
若想給 has_and_belongs_to_many 關聯賦物件而不儲存,使用 collection.build 方法。
4.5 關聯回呼
一般回呼會介入 Active Record 物件的生命週期,允許在不同的時間點,對這些物件做處理。舉例來說,可以使用 :before_save 回呼在物件儲存前做處理。
關聯的回呼與一般回呼類似,但是由集合生命週期的事件觸發。有四種可用的關聯回呼:
* before_add
* after_add
* before_remove
* after_remove
宣告關聯時新增選項來定義關聯回呼,比如:
class Customer < ActiveRecord::Base
  has_many :orders, before_add: :check_credit_limit

  def check_credit_limit(order)
    ...
  end
end
Rails 將新增或刪除的物件傳入回呼裡。
單一事件可觸發多個回呼,以陣列形式指定多個回呼:
class Customer < ActiveRecord::Base
  has_many :orders,
    before_add: [:check_credit_limit, :calculate_shipping_charges]

  def check_credit_limit(order)
    ...
  end

  def calculate_shipping_charges(order)
    ...
  end
end
若 :before_add 回呼拋出異常,則物件不會加入至集合裡。同樣地,若 :before_remove 回呼拋出異常,則物件不會從集合裡移除。
4.6 擴充關聯
不必侷限於 Rails 給關聯代理物件所加入的功能。可以透過匿名模組、加入新的查詢方法、建立物件的新方法或其他方法給關聯物件擴充功能,比如:
class Customer < ActiveRecord::Base
  has_many :orders do
    def find_by_order_prefix(order_number)
      find_by(region_id: order_number[0..2])
    end
  end
end
若是有功能可讓許多關聯共享,可以使用命名的擴充模組,比如:
module FindRecentExtension
  def find_recent
    where("created_at > ?", 5.days.ago)
  end
end

class Customer < ActiveRecord::Base
  has_many :orders, -> { extending FindRecentExtension }
end

class Supplier < ActiveRecord::Base
  has_many :deliveries, -> { extending FindRecentExtension }
end
擴充功能可以參照到關聯代理的內部,透過使用以下三個 proxy_association 的存取器:
-
proxy_association.owner:回傳關聯物件的擁有者。 -
proxy_association.reflection:回傳描述關聯的反射物件(reflection object)。 -
proxy_association.target:回傳belongs_to或has_one的關聯物件,或是has_many或has_and_belongs_to_many的關聯物件集合。
5 單表繼承
有時候會想要在不同的 Model 之間共享欄位與行為。比如我們有 Car、Motorcycle 以及 Bicycle 這三個 Model。這三個 Model 都有 color 以及 price 欄位以及一些共用的方法,但各自又有特定的行為及控制器。
在 Rails 裡面要辦到非常容易。首先,先產生一個 Vehicle Model 作為基石:
$ rails generate model vehicle type:string color:string price:decimal{10.2}
有注意到加了一個 “type” 欄位嗎?因為所有的 Model 都會存在一張“單一的資料表”裡,Rails 會把 Model 名稱存在這個 type 欄位裡。根據上面舉的例子,type 的值就會是 "Car"、"Motorcycle" 或 "Bicycle"。單表繼承(Single Table Inheritance,STI)需要有一個 “type” 欄位才可以正常工作。
接下來產生三張繼承自 Vehicle 的 Model。這裡可以使用 --parent=PARENT 選項,會產生出繼承自指定 PARENT 的 Model,而不會產生出遷移檔案(因為表已經存在了,單表)。
譬如要產生 Car Model:
$ rails generate model car --parent=Vehicle
產生的 Model 看起來會像是:
class Car < Vehicle
end
這表示所有 Vehicle 有的行為,譬如公有方法、關聯等,在 Car Model 裡也有。
新建的 Car 會存在 vehicles 表裡,type 會被設為 "Car"。
Car.create color: 'Red', price: 10000
會產生下列的 SQL 語句:
INSERT INTO "vehicles" ("type", "color", "price") VALUES ("Car", "Red", 10000)
查詢 Car 記錄也只會搜尋是 “Car” 的 Vehicles:
Car.all
會執行像是下面的 SQL 查詢:
SELECT "vehicles".* FROM "vehicles" WHERE "vehicles"."type" IN ('Car')
反饋
歡迎幫忙改善指南的品質。
如發現任何錯誤之處,歡迎修正。開始貢獻前,可以先閱讀貢獻指南:文件。
翻譯如有錯誤,深感抱歉,歡迎 Fork 修正,或至此處回報。
文章可能有未完成或過時的內容。請先檢查 Edge Guides 來確定問題在 master 是否已經修掉了。再上 master 補上缺少的文件。內容參考 Ruby on Rails 指南準則來了解行文風格。
最後,任何關於 Ruby on Rails 文件的討論,歡迎至 rubyonrails-docs 郵件論壇。